Tuesday, September 28, 2010

DIY Trivets.....Mosaic Style and Granite

First, I would like to share a granite trivet that I made for less than $1.50!  Best of all, I just LOVE that it only took me about 5 min to make! 

First, let me explain why the project began...........

I recently boiled some potatoes preparing to be mashed and without thinking, I placed the hot pot of boiling water and potatoes directly on my wooden kitchen island while I quickly grabbed a colander.  It only took about 10 sec and there it was, a ghost white heat ring.

Luckily, my husband and I have plans to refinish the top of the island in the near future so I didn't get too much grief!  Never-the-less, I decided it was time to create a trivet to sit on my island that would always be there to quickly lay a hot pot on whenever I need.  Especially if we were going to have a nice new refinished island top!


I happened to be rummaging through our local Habitat for Humanity ReStore and found this great piece of granite for $0.50!!!!!  Next, I gorilla glued some wooden "feet" to the bottom (wooden dowel buttons from the hardware store). 

I used one of my heavy Physical Therapy text books to help weight the feet while the gorilla glue dried. You know, to keep these book in use and all!


The feet were $1.88 for a pack of 8 and I only used 4 so for this project I only spent $0.94!  This brought my granite trivet to a grand total of $1.44!! (I used the other 4 feet in my next trivet below)


Within 5 min it was done and ready for use!  So easy and I love the look of it!


For those of you who haven't been to a ReStore yet, it is a thrift store with a focus on home improvement goods! I get a lot of my paint and stains from here dirt cheap!  They are a great place for tile too if you're into creating your own mosaic pieces.
After making this simple trivet, I decided I needed an extra one on hand.  My next one I chose to mosaic with broken tiles.

The process is very similar to the DIY MOSAIC MIRROR that I posted about earlier, but I go into a little more detail here.

First, I placed the larger tile pieces onto a mirror that I bought at Hobby Lobby half off for $2.  I didn't use any glue yet, just laid it all out.  I worked from the outside in making sure I had enough edge pieces to make the edges flush.


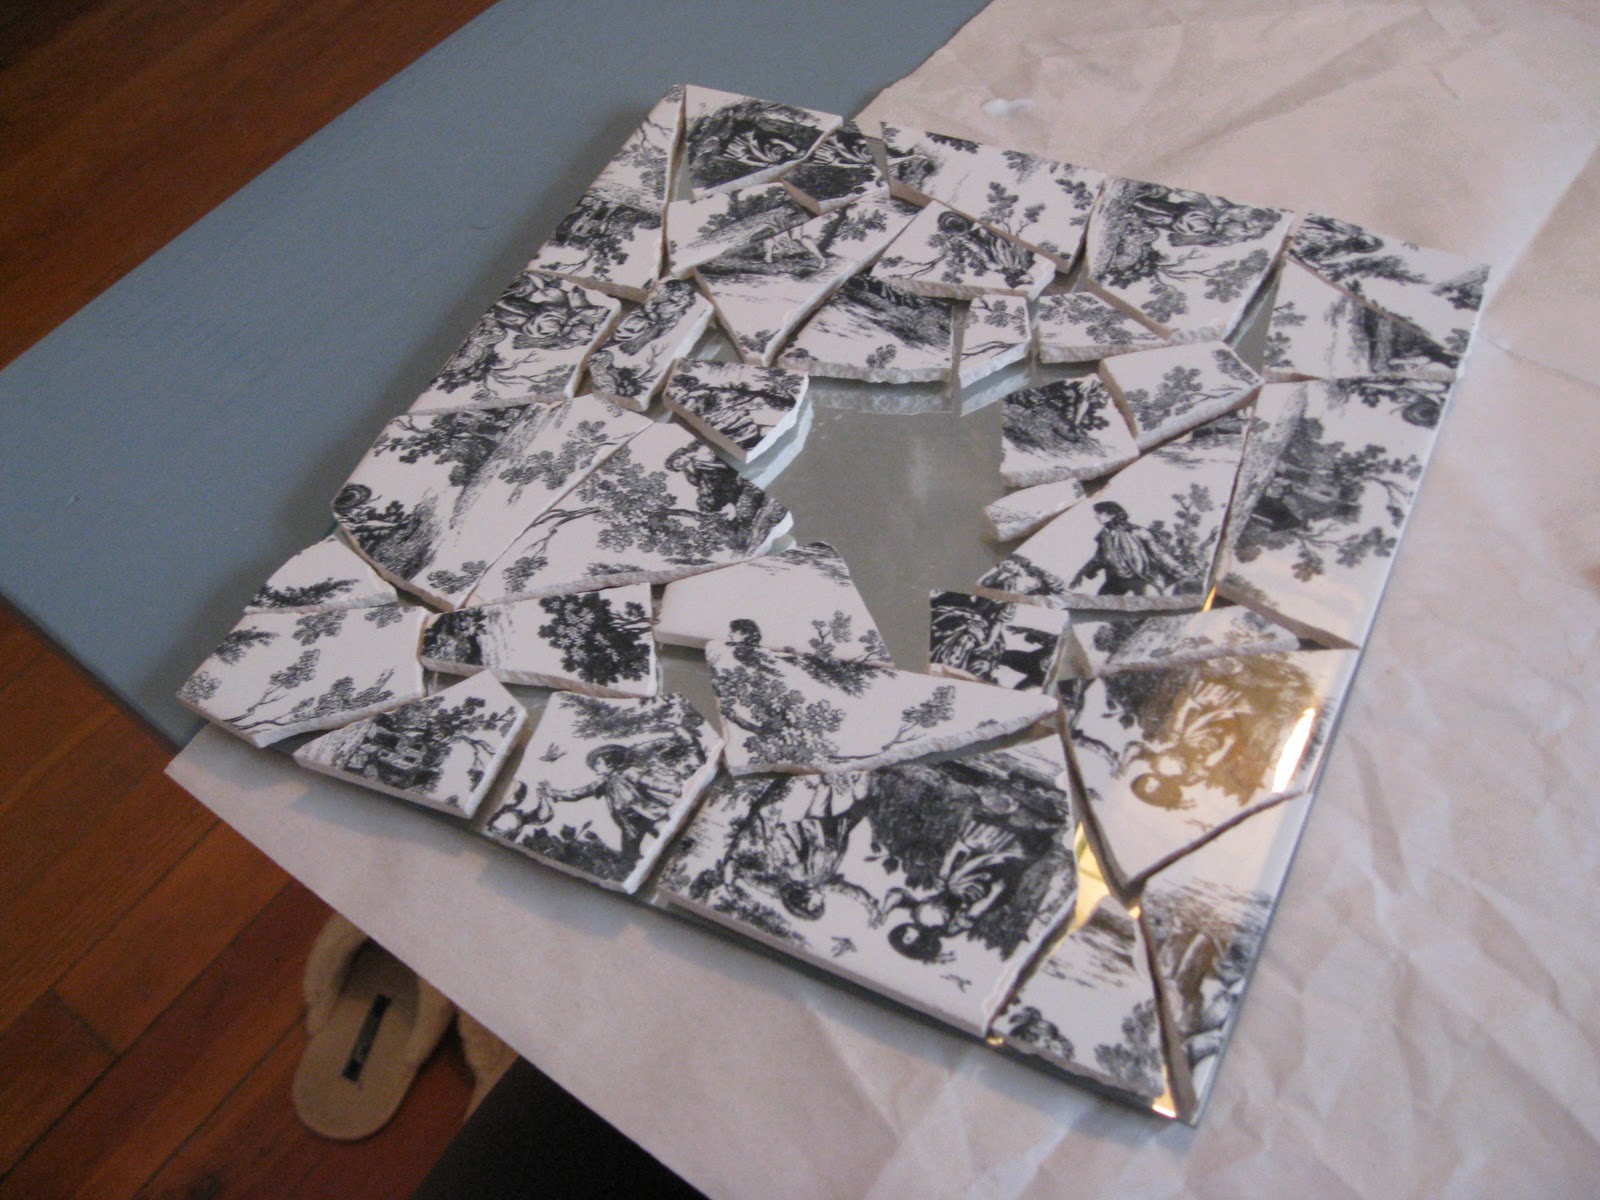
Then I filled the tight spaces between the larger pieces.  Some pieces I had to keep hammering into smaller pieces in a towel until they were small enough to fit.


Once I had everything placed how I liked it, I began to glue each piece down. 


It was easier to add the glue directly to the backs of the larger pieces with the glue bottle and then lay them, however, it was easier to use a puddle of glue to dip the smaller pieces in and then lay them with tweezers.


Let the glue sit overnight to be sure the pieces wont slide around while grouting.


Now ready for grout!


I prefer grout with sand.  It holds better shape and is easier to work with in my opinion.  Now, I highly recommend using gloves for this part!  I know this but somehow forgot this time around.  I was digging grout out from under my fingernails for days! 


Let it set 5-10 min and then polish the pieces with a damp cloth.


Once everything is dried, flip over and add the feet.  I painted these feet white to match the tile.


And there you have it!!


No more ghost white heat rings in my kitchen!!!


Linking to these PARTIES!


Sunday, September 26, 2010

DIY Vintage Milk Glass

After painting my most recent project (pictures to come), I had some really pretty shades of blue paint left over that I had blended myself.  Since I couldn't poor the little bit that I had left back into the original paint cans, I decided to try my own version of vintage milk glass.

I used leftover glass pieces from my wedding center pieces.  These used to hold tea lights.


Then I added a little bit of paint and swirled it around until the entire inside was coated.  Then, I held it upside down for about a minute to let the rest of the loose paint drip out into the trash.  Finally, I let it dry upside down on a paper plate.


I discovered I could use these as a plate pedestal like in my previous post about PEDESTAL PLATE STANDS.


I thought it looked even cuter with one turned upside down as a PLATE PEDESTAL!


I used my mason jars to hold my custom blended paint.  Once they are just about empty, these too will be my next "vintage" milk glass pieces!


Good night,
Sleep tight,
Wake up bright,
In the morning light,
Do what's right,
With all your might,
Don't let the bed bugs bite!

Good night all!!!!!

Linking to these PARTIES!

Saturday, September 25, 2010

DIY Pedestal Plate Stand

For a long time I have seen so many cute DIY pedestal cake stands and I thought I would create my own version since I have so many random small glass containers left over from our wedding decorations.  I chose not to call my cake stands since I do not plan to use them to hold cakes or desserts.  Mine are just for decoration.


It was fun experimenting with all the different kinds of containers I had on hand.


Don't mind the plates, these are temporary visual aids until I find that perfect little plate during my next thrift store run.


I also found fun little decorations to add in the bases.  I glued the bases on with epoxy.


I added one of my grandmother's handmade doilies that my mom had recently given to me.  I like how this one turned out.


Hope you're having a great fall weekend~

Linking to these amazingly creative PARTIES!


Sunday, September 19, 2010

Writer's Desk & Chair Remodel

We snagged this old writter's desk and chair off of Craigslist for $20!  Of course they didn't look like this when we got them, but look below for their absolute transformation!


To begin with......


1st step, remove drawers


2nd, remove pulls for painting.


3rd, 4th, 5th & 6th....sand, clean, prime, and paint (x3)!


7th, remove ugly tan vinyl cover from beaten up little chair and recover with cute fabric.  (Sorry I forgot to get a before photo of the chair, it was in worse condition than the desk!)


And..........................................

TA DA!


We used Minwax Polyshade Bombay Mahogany stain on the top.  I just LOVE the color and LOVE a stain and poly in one!!!!


Off-white on the rest including the chair, original hardware back into place, and finished!!!


The top coat is such a beautiful rich color, I can't stop staring at it!!!


This will probably come in handy while I try to keep up with my continuing education in Physical Therapy!!


I was supposed to refinish her and give her up....I just don't see that happening now!

Linking to these amazingly creative PARTIES!


Saturday, September 18, 2010

Mason Jar Organizing and Decorating

Mason Jars In My Home:


I have a special place in my heart for mason jars. I am not sure why I LOVE to use them as my drinking glasses, but I get a little flutter of excitement each time I empty out a jar of jelly and place it in the dishwasher to be cleaned for a future use!
  
I have decided to share my use of mason jars in my bathroom and kitchen.  Here is a picture of my bathroom. Very cramped with very little counter space.


I'm not sure why I have a plant in my shower but something about it makes my showers feel more exotic and fresh!


Here I have used mason jars to hold my Q-tips and cotton balls.  I used simple screw in knobs from Ace and bent metal wire around the jars.  They were ready to hang in about 10 min! 


This saved me a lot of counter space and I hate having to get into a cabinet for the things I use every morning!


 I tied twine around two more and placed a votive candle with some dollar store sea glass inside each of them.


Notice the leaves in a mason jar below?


I love them without hanging somewhere as well.  I kept the twine around the tops.


I love their simple charm!


UPDATE:  These next few pictures are amazing and I can already feel my next project coming on!


Linking to:


Photobucket